
2 domains, 1 host
Yeah, I ripped the title of this post from the infamous viral video (probably NSFW, wiki link) but it was funny and worked well here.
For those who have been following me somewhat, I recently joined into a venture of sorts with friends in order to post our many movie reviews collectively under a single banner known as The Amateur Critics Guild. It was a simple idea and tons of fun to actually build the branding, especially the About page, which still cracks me up when I look at it.
Anyway, back to the original purpose in this post. We needed a domain for the site and finally settled on theacguild.net because we liked the name and it was available. Mostly it was available. We only wanted to pay for the domain and not the hosting since my current site, this one, was probably only using about 30% of its full capacity. We knew we could just forward the domain and be done with it.
I setup wordpress for The ACG within a new directory on my site and set the forwarding rule through my provider (1and1). The site was up and running, but one glaring issue continued to bother me as the URL of the site would always be something like “heroinc.org/theacguild/<some post naming structure>”. This may have been a cheaper route than purchasing more hosting space but I knew that I had not had this issue earlier when I had the domain apenguinandme.com. After a few bad attempts, here’s how to have it work so you can have 2 domains and 1 host (recursion anyone?).
Setup The Second Domain
- Buy the second domain.
- Within the domain, setup a forwarding rule. 1and1 allowed me 2 options for forwarding the domain: 1) Provide a url, 2) Provide a home directory for the domain.
- Choose the option to “provide a home directory for the domain”. Option 1 would just forward the url and you would always have “domain1.com/domain2directory” for your website. Option 2 allows for “domain2.com” and “domain1.com” without anyone needing to know the difference.

I assume that the option of forwarding to a particular directory will only work if the domains are purchased from the same hosting company where the site is hosted. I could be wrong on that, but I doubt it.
Now that the forwarding is setup, you are good to go. However, what if you were like me and setup the wordpress site improperly the first time? Well, good thing I did this first for you. Here’s how you correct your wordpress installation.
Bad WordPress Installation Fix
Perform these steps during offhours for your site so that you don’t cause problems if issues come up.
- Backup the database associated with wordpress installation. I’m always a fan of backing up so that you can revert back to the original if things go wrong.
- Backup the wordpress directory where wordpress is installed. Like I said, I’m a fan of backups.
- Within the admin page of your wordpress installation, navigate to the Settings / General page.
- Change the “WordPress address (URL)”. For example, before mine was “http://heroinc.org/theacguild”. After I updated it, it said “http://theacguild.net”.
- Change the “Site address (URL)”. Same example as before. Mine was “http://heroinc.org/theacguild”. After I updated it, it said “http://theacguild.net”.
- Save the changes. The site might act up for a second but don’t worry about it.
- NEXT STEPS ARE DANGEROUS WHICH IS WHY WE TOOK BACKUPS. If you skipped steps 1 and 2, do them NOW. I’ll wait….
- Navigate to the database for your wordpress installation. With my site, I use phpMyAdmin.
- Use the search function to query the database tables for the old domain name. The returned tables from the search all need to be updated to remove the old references so that all of your site links work.
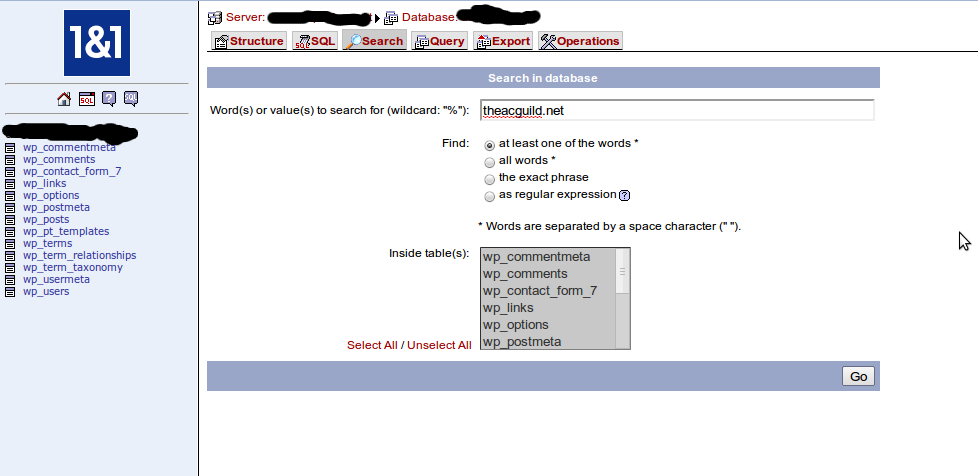
- Using a sql query, you can do a quick replace throughout the database table. The following sql query will do the replace for you and it should be repeated for each table that was returned by the query. Just remember that the query will replace all instances and that may not be what you always need so use caution. I know that I had a post or two on the new site where I linked to my actual real site and I had to manually make those changes so not to override what my post was meant to use.
UPDATE wp_posts SET INSERT_TABLE_NAME_HERE = REPLACE (
INSERT_TABLE_NAME_HERE,
'olddomain.com',
'newdomain.com');
- Within your wordpress installation directory, search for “olddomain.com”. I believe it was within 4 of my files (404.php, header.php, sidebar.php, and style.css).
- Within each returned file from the search, do a find and replace to change “olddomain.com” to “newdomain.com”.
- Finally, in the words of the great wordpress instructions, go do something nice for yourself as you are now finished in updating your site to properly use the new domain.
Here’s hoping this will help other people who made a stupid mistake like I did.
Posted under Internet | Tagged as 1 host, 2 domains, url forwarding, wordpress